Crazy holidays! Christmas was wonderful, yet just as everyone else in the family wrapped up their respective terms for a glorious winter break, I began a new term. Balancing that with Christmas sewing and projecting, gifting, and mothering, etc. I never had a change to post this:
I love Hobby Lobby and Dear Lizzie is a Paradise; but, my favorite place to shop is my own home.
I am a crafter, quilter, embroiderer, artist, and romantic. I love celebrating and I love using celebrations as an excuse to change-up my space and make everything brighter. I love candles and twinkle lights; and, I adore real glitter made of glass. If I were a millionaire, I would boost the economy by furthering the immortal philosophy of Dolly Levi’s dearly departed husband, and (freely, with both hands) spread sparkles and coziness everywhere by supporting booming chic boutique/ crafting markets [Hello, Dolly!, 1969). Well, almost. I have other, more sustainable goals for serving humanity, which rank higher on my list of life goals; however, I believe “bling” holds a very important role in the betterment of society. It makes {most} women happy! My kind of bling is simple, meaningful, and makes me glad when I look at it.
I have learned from good and not-so-good times that I need, crave, and respond well to a little whimsy and brightness; especially when my body temperature is plummeting and the sky outside is a constant, drab gray. I tackle do-it-yourself projects fearlessly; so, I love the splurge I experience when I sneak away occasionally for a few minutes of creative “what if”…. and I may take advantage of a 40% off coupon at Hobby Lobby, even if my savings is a whopping 85 cents. I love walking into a twinkly, cheerful boutique full of softness and glitz, and strolling to the strains of Pachelbel’s Canon or a quirky french bistro accordian-accompanied tune. So where do I shop when my pennies are otherwise engaged? I shop my own home.
This Christmas, my picture window sports a panoramic view of brown, grey, and concrete. Ugh. I decided I needed some green! Wishing for a few minutes, I thought of going crazy on home decor and live plants. (Boy, would I pay for that? Nope!) Well, I dug through my basement storage bins for my artificial greenery. My children helped put up our Christmas tree. I took a long, virtual ecursion via Pinterest, and found some scenescapes I loved. Taking elements from several and modifying them to use what I already had in various rooms of my home, and to fit my quirky 70’s era space, I got to work with some glitter, glue, ribbons, and latex paint- all stuff I had on-hand. My front room came together with inspiration, which I gathered in my 2012 Christas Theme Pin board. (My personal theme for this season is “Joy.”) I welcome everyone; so, stop by Pinterest and check it out if the “crafty decorating bug” has struck you, too.
Here are a couple of my favorite elements and how I pulled them together from my favorite inspirations:
The Butler Family:

@http://radiobutlers.blogspot.com/2011
/12/christmas-decorations-living-room.html,

(from theshabbycreekcottage.com).
Both of these blogs feature mini Christmas trees over the fireplace creating gasp-worthy cuteness. I have two little artificial trees; unfortunately, my ceiling is low and I have a raised fireplace; so, my space is not tall enough to acommodate that. I found my own spin.
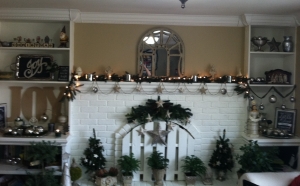
First, my fireplace and mantel are freshly-painted with paint leftover from another project; so, the inside, though vacuumed, bothered me. It was like a black hole in the middle of all that white. Instead of spending money on a new fire screen, which I would have loved, I grabbed our skill saw and one of the pallets I reclaimed when we had our new roof put on in August. I sanded the front and top and painted it over with the same paint used on the rest. It reminds me of a little picket fence. The best part is that although I may cover up that black hole and hang a wreath over it, the fence allows me access to the fireplace when we want or need it. (Project cost: $0; Time: about 2 hours)
Second, my evergreen garlands took their traditional places over the arch, on the mantel, windows, and doorways. I purchased all my garlands 50-75% off during post-Christmas clearance sales. (Although it involves planning ahead, I think it pays to shop off-season!) My two mini-trees sit down on the hearth, one on each side. The pots were Christmas red originally; however, I repainted them with some pearly cream paint so they would blend with everything else. Some mini-mercury glass bulbs and my tiniest paper and German glass glitter stars go with them.
*I DID buy three tiny, live Norfolk Island Pines at the hardware store, which rest right in the middle of the hearth among more finials and vintage cast iron pots. Although I love them, the trees were about $18 total. The good news is that I get to keep them and watch them grow year-round. I borrowed the pots from a display I had over my kitchen cupboards.
![IMG_1372[1]](https://dragonflywingz.files.wordpress.com/2013/01/img_13721.jpg?w=334&h=300)
My pictures do not do justice for the twinkly lights. I adore turning off all the main lights to bask in the glow of all the twinkly lights. (Insert happy sigh here.) During the day, while I have the lights off, the small glitter stars scattered through the evergreens and hanging from my chandelier sparkle enough to keep up the ambience.
Third, more sparkle: candles in mercury glass vases alternate with creamy, cast iron finials along the mantel, and vintage silver beads and my DIY glitter and paper stars hang along my built-in stocking hangers (we put stockings up for Christmas Eve only, a left-over protection mechanism for handmade stockings I used when my children were all tiny ones).
![IMG_1322[1]](https://dragonflywingz.files.wordpress.com/2013/01/img_13221.jpg?w=208&h=300)
![IMG_1326[1]](https://dragonflywingz.files.wordpress.com/2013/01/img_13261.jpg?w=355&h=323)
![IMG_1360[1]](https://dragonflywingz.files.wordpress.com/2013/01/img_13601.jpg?w=393&h=355)
*When I first built my book cases and mantel, I saved up for those gorgeous stocking holders; yet even lightweight stockings pulled them over, which worried me with dentable wood floors and little ones below. After a year or two, I decided they weren’t practical. I bought a 1/2″ diameter dowel at Walmart (for less than $1) chopped it into little stubs, and drilled holes into my mantel. Painted white, they mostly blend into the mantel, yet I love the excuse to have something up most of the year anyway. They create an easy way to drape garlands for every holiday.
Fourth, I wanted to focus on “JOY” this season, so I have “JOY” written everywhere to remind me where I need my priorities focused.
1)I had some cheapy chipboard “JOYS” (poorly glittered, the dear things), so I gave them a coat of spray adhesive and dipped them in the good stuff (silver glass glitter)! I hung one over a burlap ribbon, another in the middle of one of my evergreen wreaths, and the last over my newly chalkboard-surfaced silver tray. I could not find any chalk in the house, although I know it is here somewhere, so what else to use in its place? Glitter. [Note: the silver tray is one I rarely used, and the Rustoleum chalkboard paint was a leftover from another project, so this one did not cost a thing either.]
2)Another giant JOY adds a backdrop to one of my main shelves on the left side bookcase (pictured a couple of rows above). It is made of plywood. I planned on glamming it up; however, I decided to cover it in plain, brown craft paper. Now it matches the color of the burlap ribbons and our brown paper packages under the tree. (Yay!)
![IMG_1291[1]](https://dragonflywingz.files.wordpress.com/2013/01/img_12911.jpg?w=224&h=300)
![IMG_1292[1]](https://dragonflywingz.files.wordpress.com/2013/01/img_12921.jpg?w=224&h=300)

3) I needed to do a little repair on my paper star wreath from last year, so I added a new “Joy” label while I was at it.
![IMG_1339[1]](https://dragonflywingz.files.wordpress.com/2013/01/img_13391.jpg?w=224&h=300)
4)I had another idea to mimic the foil-edged pendants I love so much. I found this whimsical font in MicroSoft Word and printed JOY faintly on a piece of scrapbooking paper. I used a toothpick and a Q-tip to spread a light coat of school glue over the printed letters before sprinkling them with German glass glitter. Once it dried well, I framed it with a $1 picture frame. I taped the edges with masking tape instead of foil, then painted well with one coat of black and one coat of silver acrillic craft paint to simulate leading. (Minus the flash from the camera in the middle of the O, it looks darn cute hanging on my wall, if I do say so myself.)
![IMG_1333[1]](https://dragonflywingz.files.wordpress.com/2013/01/img_13331.jpg?w=300&h=224)
Fifth, I had more faux mercury glass balls than I needed on the tree, thanks to my mega project last year. I decided to use them on my shelves. I scattered a few on other silver trays, lined with a sheet of moss intended for the woodland Christmas village I planned, and paired the ornaments with small, mercury glass votive holders containing battery-operated tealight candles. Did you know Dollar tree sells them 6/$1.00? I did not, until mid-December. (Another, “yay!) More mercury glass balls hung from ribbons. I think placing the ornaments and candles in various locations tied the room together nicely, especially with the rest of my decor mixing styles and mediums.
![IMG_1329[1]](https://dragonflywingz.files.wordpress.com/2013/01/img_13291.jpg?w=300&h=279)
![IMG_1346[1]](https://dragonflywingz.files.wordpress.com/2013/01/img_13461.jpg?w=224&h=300)
![IMG_1360[1]](https://dragonflywingz.files.wordpress.com/2013/01/img_13601.jpg?w=224&h=300)

![IMG_1357[1]](https://dragonflywingz.files.wordpress.com/2013/01/img_13571.jpg?w=215&h=143) My tree this year is a combination of a couple of theme trees (e.g. stars, woodland elements, etc.) I have created in the past; so, while new, it boasts a comforting traditional appeal for my young ones. I made most of my ornaments. (My Pinterest page contains links to tutorials for my glitter glass stars and the faux mercury glass balls. ) Twelve wooden birdhouses have weathered through twelve years of little children’s Christmas seasons fairly well. I bought them unfinished for less than a dollar each right after Christmas one year. (What a fun find that was. Painting them is a happy memory.) I found several bird nest ornaments the same day. (“Yay” number three is for post-holiday clearance sales. )
My tree this year is a combination of a couple of theme trees (e.g. stars, woodland elements, etc.) I have created in the past; so, while new, it boasts a comforting traditional appeal for my young ones. I made most of my ornaments. (My Pinterest page contains links to tutorials for my glitter glass stars and the faux mercury glass balls. ) Twelve wooden birdhouses have weathered through twelve years of little children’s Christmas seasons fairly well. I bought them unfinished for less than a dollar each right after Christmas one year. (What a fun find that was. Painting them is a happy memory.) I found several bird nest ornaments the same day. (“Yay” number three is for post-holiday clearance sales. )
I spent a bit of time on sewing Christmas dresses and gifts for my children this season. Although most of our gifts were simple, I wanted a nice presentation and I did not want to spend any money on wrapping. I almost succeeded. I became a little desperate one afternoon when I realized I did not have any wrapping paper on hand. Because I have quite a few bits of burlap in my Christmas decor, wreaths, wide burlap ribbon on the tree, etc., I wanted to stick with cream, brown, and green. All I could find was my stash of packing boxes. (I have only one “pack rat” tendency: I collect a moderate stash of tiny-to-mid-sized boxes in my garage for gifting and mailing because I hate buying empty boxes.) Of course, the boxes sported packing labels and printed bleck; so, I took them apart at the seams and used hot glue to put them back together inside out. I wrapped the boxes in burlap ribbon, which I can reuse on something else later on, followed by repurposed ribbons and tulle from past 
![IMG_1353[1]](https://dragonflywingz.files.wordpress.com/2013/01/img_13531.jpg?w=203&h=300)
![IMG_1355[1]](https://dragonflywingz.files.wordpress.com/2013/01/img_13551.jpg?w=206&h=300)
![IMG_1356[1]](https://dragonflywingz.files.wordpress.com/2013/01/img_13561.jpg?w=161&h=238)
![IMG_1354[1]](https://dragonflywingz.files.wordpress.com/2013/01/img_13541.jpg?w=196&h=237)
tree decor or packaging. One fun side benefit was that my children began singing the chorus, “brown paper packages tied up with string….these are a few of my favorite things…” (We heard that a few times over the two weeks prior to Christmas and it was more than ok with me.) I wrapped a few packages up in burlap or cotton broadcloth from my sewing fabric boxes. I eventually found some oddly shaped packages like dollar store coloring books, which would not easily work in a box, so I spent $4 on brown wrapping paper; however, I used only one roll, so I am all set for next year.
My requirements were 1)What would increase a sense of warmth, love, and joy in my atmosphere? and 2)What would make others glad without taking my joy from me? The result: We had a warm, lovely Christmas. What I chose to work on was purposeful and I avoided driving myself nuts on the typical holiday list of “shoulds” and “supposed to.” It was fun.
What I liked: I had stars and twinkle lights everywhere, which cheered up my shadowy, North-facing rooms.
What I would like to improve: I still need more light and the larger arch of the fireplace dwarfs arched mirror above it.
The moral of this past-due tale: a little thought and rearranging can create some fun, relaxed, and familiar surroundings without spending a lot of money (or, dare I say, any); so when in creative mode, shop your own home first.
My next post highlights what I am doing this month to transition from Christmas to Anniversary/Valentine’s Day decor. Until then,


![IMG_1430[1]](https://dragonflywingz.files.wordpress.com/2013/01/img_14301.jpg)
![IMG_1429[1]](https://dragonflywingz.files.wordpress.com/2013/01/img_14291.jpg)


![IMG_1372[1]](https://dragonflywingz.files.wordpress.com/2013/01/img_13721.jpg)
![IMG_1322[1]](https://dragonflywingz.files.wordpress.com/2013/01/img_13221.jpg)
![IMG_1326[1]](https://dragonflywingz.files.wordpress.com/2013/01/img_13261.jpg)
![IMG_1360[1]](https://dragonflywingz.files.wordpress.com/2013/01/img_13601.jpg)
![IMG_1291[1]](https://dragonflywingz.files.wordpress.com/2013/01/img_12911.jpg)
![IMG_1292[1]](https://dragonflywingz.files.wordpress.com/2013/01/img_12921.jpg)

![IMG_1339[1]](https://dragonflywingz.files.wordpress.com/2013/01/img_13391.jpg)
![IMG_1333[1]](https://dragonflywingz.files.wordpress.com/2013/01/img_13331.jpg)
![IMG_1329[1]](https://dragonflywingz.files.wordpress.com/2013/01/img_13291.jpg)
![IMG_1346[1]](https://dragonflywingz.files.wordpress.com/2013/01/img_13461.jpg)

![IMG_1357[1]](https://dragonflywingz.files.wordpress.com/2013/01/img_13571.jpg)

![IMG_1353[1]](https://dragonflywingz.files.wordpress.com/2013/01/img_13531.jpg)
![IMG_1355[1]](https://dragonflywingz.files.wordpress.com/2013/01/img_13551.jpg)
![IMG_1356[1]](https://dragonflywingz.files.wordpress.com/2013/01/img_13561.jpg)
![IMG_1354[1]](https://dragonflywingz.files.wordpress.com/2013/01/img_13541.jpg)


